
Want to run a successful AI Print Shop? Discover the exact 5-tool tech stack I use to generate, upscale, and vectorize AI art for t-shirts.
The barrier to entry to initiate a design business has completely collapsed. In fact, in 2026, you don’t need to be a master illustrator to have a thriving AI print shop. The challenge is no longer the creation of the art; it is keeping the technology running smoothly to operate a professional print on demand store. While someone may know the ins and outs of crafting a prompt for Midjourney, what comes after that?
Everyone recognizes how to compose a prompt in Midjourney and acquire a fantastic picture. But what happens next? If you upload this raw, 1024- pixel AI image to Direct Shopify or Printful, the result will be a blurry, Pixelated crap, a physical T- shirt.
To establish a professional brand that customers Trust, you warrant a reliable technical workflow. You have to turn pixels into products.
In this post, I stretch back the curtain, but my personal studio workflow. I share the exact 5- tool tech stack I use daily, advanced, vectorize, and prep AI art for high-quality apparel printing. This is not a theory. This is the process. Those forces my business.
1. The Generator: Midjourney V7( or Local Models)
Every design begins with a raw idea. In 2026, the market is flooded with AI generators, but for professional print work, consistency is the key.
While I occasionally experiment with local models, I prefer the” Banana Nano” to specific repeating patterns for my work character design and complex illustrations. The rest is Midjourney v7. The reason is uncomplicated: its understanding of composition and lighting is outstanding, which means less time fixing awkward hands or weird artifacts later.
⦁ Pro Tip to Print: When I create, I always include keywords– ar 2: 3( vertical aspect ratio to chest prints) and- stylize 50( Uphold the style cleaner and less chaotic, makes it easier to vectorize).
The goal on this stage is not perfection; It gets stronger, compelling concept. It will resonate with him in a specific niche.

(Figure 1: Quality matters at the source. A high-quality generation makes every subsequent step easier.)
2. The Upscaler: Moving on 1024px
It is the most common mistake beginners make when constructing a standard AI generation, usually around 1024×1024 pixels. To a crisp print, but a large T- shirt, choose a print provider, printful establishes a recommendation for a file that is at least 4500×5400 pixels, 300 DPI. It is at least 4500×5400 pixels, 300 DPI.
If you increase a small image, it sounds terrible. You require an AI upscaler. It constructively adds detail without being” deceptive” and weird textures.
My go- to tool is Topaz Gigapixel AI( Or sometimes Magnific AI for stylized art). As opposed to basic browser- based apps that only fade the edges, these tools analyze the image and rebuild its sharpness and clarity. They transform a blurry 1MB file into a crisp, 50MB print-ready asset.
⦁ The Black Shirt Test: An advanced real test is how it handles dark backgrounds. A bad upscalar will leave noisy gray artifacts, but a black background that will print as an ugly, visible square, like a black T- shirt. An effective one holder the background pure (hex:# 000000) black.
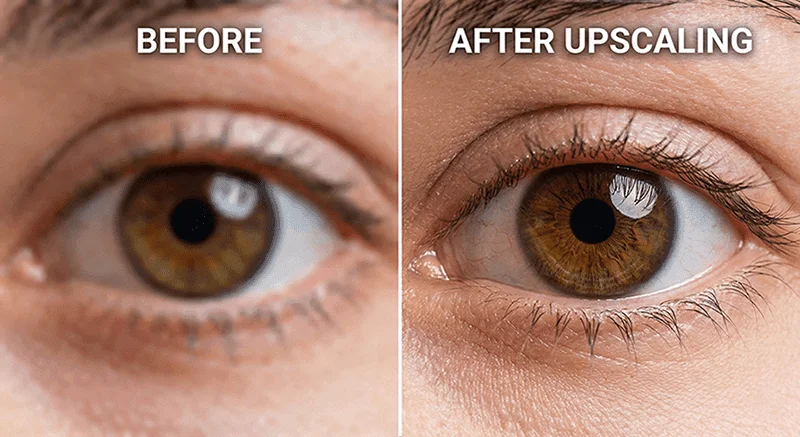
(Figure 2: The difference between a standard generation and a 4x upscale ready for 300 DPI printing.)
3. The Vectorizer: Formation of sharp edges
For some styles– especially logos, typography, and screen printing designs– a raster(pixel-based) image is not enough. You need a vector file( SVG, EPS, or AI) that can be scaled infinitely without losing quality.
As I discussed in my previous review of Affinity Designer vs Adobe Illustrator, this is an area where your choice of software matters. While I am devoted to Affinity for the most of my design work, I’m still addicted to specialized tools for auto-tracing.
For quick jobs, browser-based tools such as Vectorizer. ai are incredible. They implement AI to discover and transform shapes and clean paths in seconds. For more complex illustrations with many colors, Adobe Illustrator’s classic Image Tracking feature( with custom settings) is still offers the most control.
To be a clean vector file is very significant if you ever want to use vinyl cutting, Embroidery, or large- format printing.

(Figure 3: Converting raster images to vectors ensures razor-sharp edges at any size.)
4. The Color Fixer: CMYK vs RGB Reality Check
This step protects you from angry customer emails.
AI models create pictures in the RGB color space, which is built for screens. Screens can exhibit millions of Bright, neon, saturated colors. However, printers utilize CMYK ink, of which there is a much smaller color range( gamut).
If you send a neon cyan design to a printer, it will return dull and muddy.
Before finalizing the file, I bring it into Adobe Photoshop( Or Affinity Photo). I use the” Gamut Warning” tool to identify which colors are not printing correctly. After that, I use adjustment layers- and sometimes Photoshop’s new Generative Recolor Functions- to shift those colors into a printable range while keeping the design looking vibrant.
It’s better to fix the color yourself, rather than letting the printer’s automate software do a bad job of it.
5. The Mockup Generator: Placeit
You cannot print a physical sample for every single design you create; it’s very expensive and time-consuming. But you can’t just paste a flat JPEG onto a picture of a T-shirt and expect customers to purchase it but it looks fake.
Selling to today’s discerning online shoppers, your product images must look professional and lifestyle-oriented.
For this, I rely on Placeit. It features a massive library of high-quality photos and videos of real models wearing blank apparel. You upload your design, and their system automatically wraps it to the fabric folds, adds realistic lighting, and casts accurate shadows
The result is a photo that looks like you hired a professional photographer and model. This social proof is essential for generating clicks on Facebook or Instagram ads.
Result: The Tech Director Mindset for Your AI Print Shop
Running a successful print-on-demand business in 2026 is not just about being creative. It’s about being a competent technical director.
You must understand the journey of a file from an AI prompt to a physical garment. By building a reliable” stack” of tools— like the five I’ve outlined here, ensure the quality of your final product matches the quality of your original idea. This consistency is what builds a brand and keeps customers coming back.
What are the tools? Your current design workflow? Are there any new AI upscalers you are testing? Let me know in the comments
(Disclaimer: This article is for informational purposes only and reflects personal opinions and research. MyCreatorStack is not responsible for decisions made based on this content, and some links may be affiliate or advertising links.)

Sandaru is a senior graphic designer with over 5 years of experience in brand identity, digital design, and creative workflows. He founded Mycreatorstack to help designers and freelancers navigate AI tools, design software, and the evolving creator economy — without the hype.
Leave a Reply